Smartocto Tentacles script setup for A/B-testing and tracking
Instructions for implementing the real-time tracking script
Quick jump to section:
- Getting started: Adding smartocto Tentacles-script to your website
- Crawlers configuration
- Setup: Set default device-view for scroll depth overlay
- Setup: pageType for tracking landing pages
- Setup: Set channel (web or app) for real-time tracking
- Setup: smartocto Tentacles in a Single Page Application
- Setup: React Next implementation
- Technical requirements for A/B-testing
- Configure triggering the Loyalty Click (optional)
- Update Custom Referrer in case of SPA-website (optional)
- Remove smartocto Tentacles from your website
Getting started: Adding smartocto Tentacles-script to your website
Smartocto Tentacles script is a component used for real-time tracking and A-B testing, while the Insights script component is used to track historical data.
Please put this code on every page you want to track, including the home page, category pages, and so on:
<script>window.tentacles = {apiToken: 'API_TOKEN'};</script>
<script src="https://tentacles.smartocto.com/ten/tentacle.js"></script>
Please contact smartocto support for the required 32-character API_TOKEN.
Crawlers configuration
After you implement the Tentacles script on your website, our Technical Support team needs to configure different crawlers for different purposes. Here are some of them:
- homepage - checks URLs on your homepage based on the RegEx pattern and detects the time when the article appears and the frontend puts the homepage icon. It usually runs every 5 minutes.
- newsletter - when subscribed, it checks our Inbox and finds all article URLs, and puts the newsletter icon in the story graph.
- feed or datalayer - checks RSS feed for article details or, when the client is using Insights, gets the meta-data from the _ain object (if the Insights tracker is also implemented).
By default, it runs every minute. - facebook - once we get read-only access (Analyst role) to your Facebook page, gets the data from the posts published on Facebook. By default, it runs every 10 minutes.
- linkedin - similar to facebook, it gets the meta-data from articles published on LinkedIn, if we have access.
- conversions - used only if you implement the conversion tracking script.
By default, it runs once per hour, but as with all other crawlers, the frequency can be easily adjusted by our Technical Support team.
Please read this article for a better understanding: What are stories in smartocto Real-time?
Setup: pageType for tracking landing pages
Since January 2024 the Tentacles script can also track landing pages. Before that, it was only possible to track articles or stories, how it's called in the smartocto Real-time application.
If you want to track landing pages, please specify additional property called pageType and set it to "landing". If not specified, the script will assume it's an article page and the "article" value will be sent to our server.
<script>window.tentacles = {apiToken: 'API_TOKEN', pageType: "landing"};</script>
<script src="https://tentacles.smartocto.com/ten/tentacle.js"></script>
If you're also using the Insights tracking script, please check this page for instructions on how to implement it.
Setup: Set channel web or app/ios/android
In case you add the Tentacles script for tracking, you can attribute the platform to it: is the view tracked on the Website or your App?
If it's tracked on the website, you don't need to set any additional property, it will be "web" by default.
However, if you're deploying the script in your hybrid or wrapper app, you can explicitly set the additional channel property to either "android" (if your Android app is viewed on an Android device) or "ios" (if the iOS app is viewed on an iOS device).
It will result in adding the "ch" parameter in the tracking request to our collector API.
Example script with additional channel property:
<script>window.tentacles = {apiToken: 'API_TOKEN', channel: 'android'};</script>
<script src="https://tentacles.smartocto.com/ten/tentacle.js"></script>
In some cases, you will have to explicitly include the "brandId" property, so the final setup will look like this:
<script>window.tentacles = {apiToken: 'API_TOKEN', brandId: "BRAND_ID", channel: 'android'};</script>
<script src="https://tentacles.smartocto.com/ten/tentacle.js"></script>
The BRAND_ID is the subdomain of the corresponding real-time dashboard: https://BRAND_ID.smartocto.com
In case your website is viewed by a visitor in the browser on an Android or iOS device, don't add the channel parameter.
Setup: Set default device-view for scroll depth overlay
In case you want your editors to use a default view in the scroll depth-function of the Tentacles-overlay, you can set the device-type in the Tentacles-settings. To set the default value, please specify additional property called scrollDepthDevice and set it to the device you want: 'mobile', 'tablet' or 'desktop'. If not specified, the script will use 'desktop' as default value.
<script>window.tentacles = {apiToken: 'API_TOKEN', scrollDepthDevice: "mobile"};</script>
<script src="https://tentacles.smartocto.com/ten/tentacle.js"></script>
Setup: Single Page Application
If your website is built as a Single Page Application (SPA), you must trigger the script every time the content and URL are changed.
To trigger the script, execute the following command:
window.postMessage('activateTentacles');
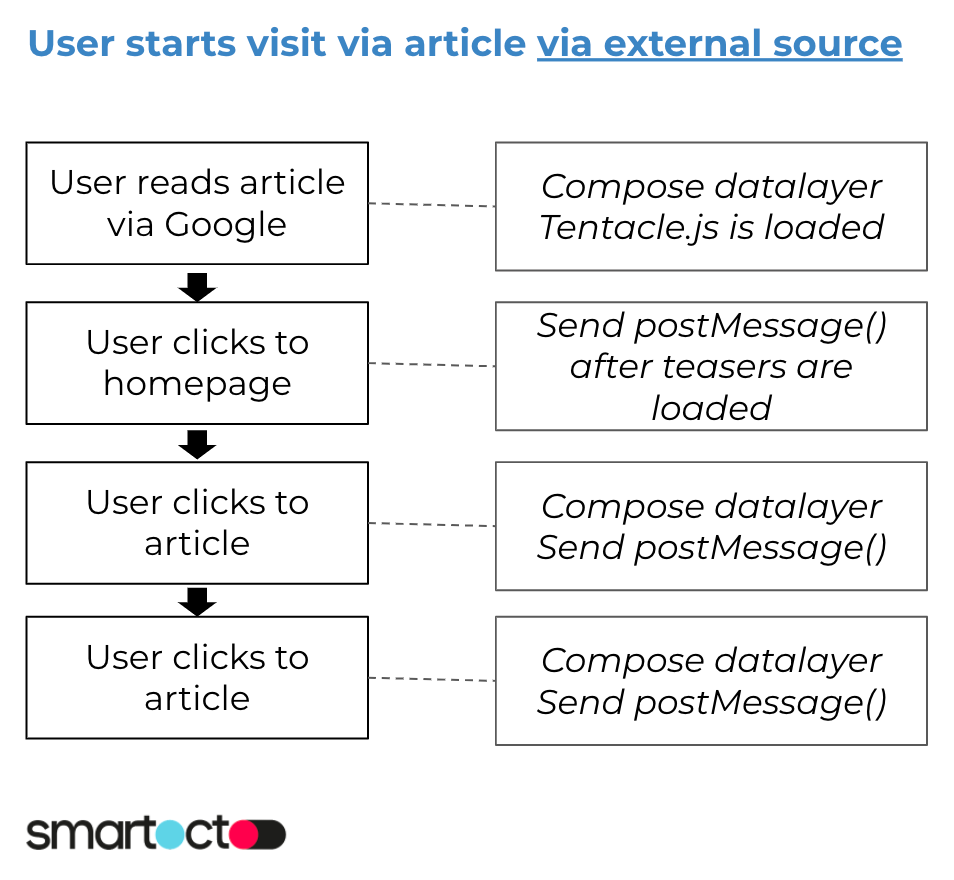
In case of an article page, it's after the full article content is loaded.
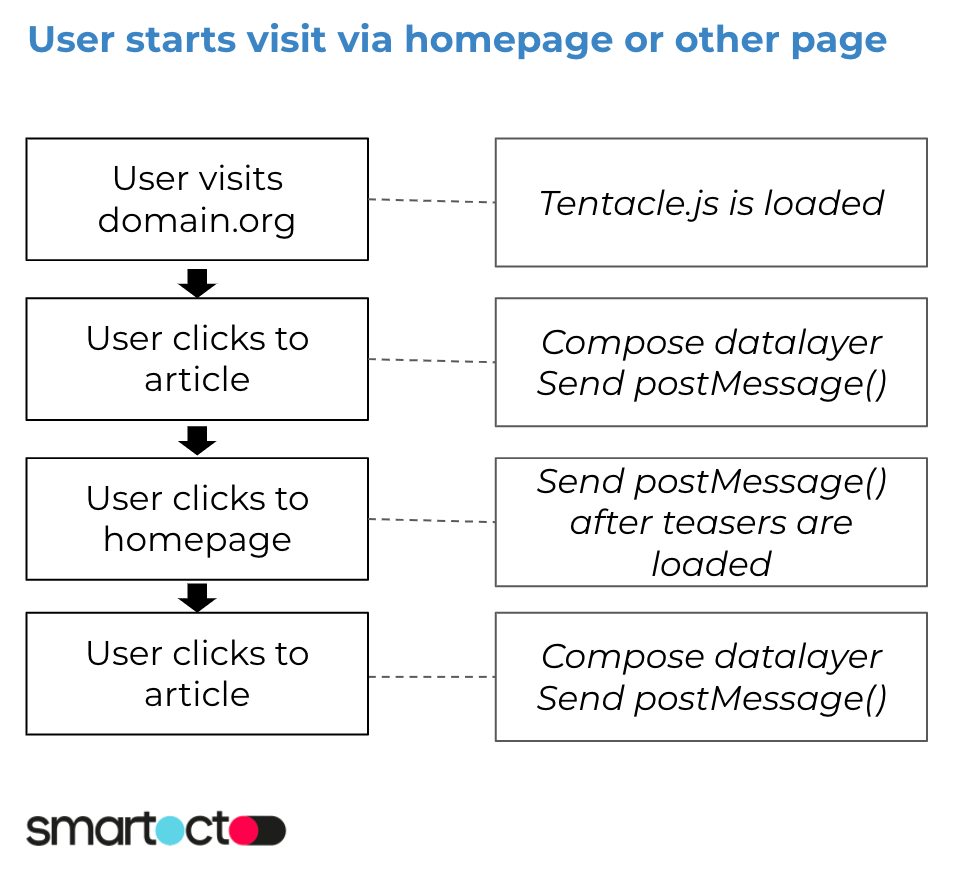
In case of the home page, the command should be executed when all the teasers are loaded.
Example situations
The following images visualize in what situations the command should be fired.
Setup: React Next implementation
If you use Next.js, you should make sure that the Tentacles script is not rendered server-side.
Here is an explanation from the official documentation:
https://nextjs.org/docs/advanced-features/dynamic-import#with-no-ssr
Technical requirements for a/b-testing
Example that will work since all text-elements (in this case a <h1>) are within the link-element (<a>):
<article>
 <a href="https://www.yourdomain.org/path/to/story/">
  <img src="/path/to/teaser-image.jpg" />
  <h1>John builds largest replica of an octopus in LEGO</h1>
 </a>
</article>
<article>
 <a href="https://www.yourdomain.org/path/to/story/">
  <img src="/path/to/teaser-image.jpg" />
 </a>
 <h1>John builds largest replica of an octopus in LEGO</h1>
</article>
Validation: how to check if teasers are detected
You can check if the teasers are located by the Tentacles-script:
- Open your homepage in Google Chrome
- Click on a teaser with the right mouse button and click on Inspect Element
- Locate the link-element (<a href="...">) of the teaser
- In that element a property called tentacle-id must be shown, as seen in the image below:
If the part is missing, check if the script-command is fired after the teasers appear.
Exclude linked elements from having colored anchor
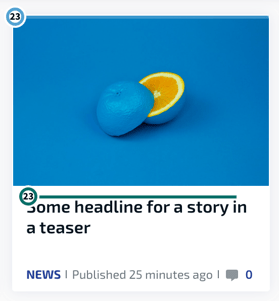
It can happen that your teasers has multiple anchors with links, as seen below. In the image the comments-icon has the HTML-name ‘total-comments’. Therefore all links with that name will not have an anchor as it is a setting, as seen in the image. But the photo has still an anchor since that link-element is not excluded.

If you want to exclude elements with links - for example the photo in the example above - from having an anchor, follow the instructions from below.
Name the links
Your developer has to identify the HTML-elements by adding a unique classname, which is different than for example the textual links. The elements - in this case the image - with these names can be excluded from adding a colored round and line.
Example of the change of HTML-naming:
In the code below you see the link around the image just has a href-attribute, but no class.
<article class="some class-names here">
 <div class="post-image-container">
  <a href="https://yourdomain.org/some/url">
   <img src="https://yourdomain.org/some/image.jpg" class="post-image">
  </a>
 </div>

 <div class="post-text-container">
  <h3 class="uc-block-post-grid-title">
   <a class="title-link" href="https://yourdomain.org/some/url/">Some headline for a story in a teaser</a>
  </h3>
 </div>
</article>
To exclude the link for the image, the class image-link is added to the link:
<a class="tentacles-ignore" href="https://yourdomain.org/some/url">
<article class="some class-names here">
<div class="post-image-container">
<a class="tentacles-ignore" href="https://yourdomain.org/some/url">
<img src="https://yourdomain.org/some/image.jpg" class="post-image">
</a>
</div>

<div class="post-text-container">
<h3 class="uc-block-post-grid-title">
<a class="title-link" href="https://yourdomain.org/some/url/">Some headline for a story in a teaser</a>
</h3>
</div>
</article>
When applied, the links with (in the example above) the name tentacles-ignore can be excluded from showing an anchor and line.
Configure triggering the Loyalty Click (optional)
The Loyalty Click is a qualitive pageview which is measured 10 seconds after a visitor clicks on the teaser to view the story.
This indicates a visitor reading the story instead of just opening the story from the overview.
You can configure the amount of seconds before triggering this qualitive measurement, by adding the settings below on window._ain.
In the example below the value for loyalty_click_timeout is set to 18000, which means that the Loyalty Click is send 18 seconds after the visitor lands on the article page via the overview page.
Update Custom Referrer in case of SPA-website (optional)
In the realtime tracker it's possible to define a referrer for a page view when using a SPA (Single Page Application) website.
document.referrer or document.location.origin are used by the tracker, but for SPA-websites the referrer must be offered to the tracking script. Otherwise the referrer of the first pageview is assigned to all other following pageviews. You can define the referrer, just like in the Insights-tracker, in window._ain.referrer.Good practice:- User lands on www.domain.org/page-a.html, value of
document.referrerwill be used by the tracking script - Pageview is tracked by triggering the tracker
- Website must update
window._ain.referrerto the current viewed url (www.domain.org/page-a.html)
- User navigates to www.domain.org/page-b.html, value of
window._ain.referrerwill be used by the tracking script - Pageview is tracked by triggering the tracker
- Website must update
window._ain.referrerto the current viewed url (www.domain.org/page-b.html)
- User navigates to www.domain.org (homepage), value of
window._ain.referrerwill be used by the tracking script - Pageview is tracked by triggering the tracker
- Website must update
window._ain.referrerto the current viewed url (www.domain.org/)
Removing smartocto Tentacles(-script) from your website
If you need to remove the real-time tracking script, just remove the <script> tags as shown before.
In case you fire the command window.postMessage('activateTentacles');. also remove the command from your website.
In case you manually compile requests -for example for tracking purposes- remove those tracking-requests from your website(-application)
Questions about implementation?
Please contact smartocto support if you need any further explanation on this subject.
Installing the plugin
If you want to launch smartocto tentacles, use the plugin or booklet on smartocto.com/tentacles.


